Fabric Storage Ideas: Keep Cuts Usable and Easy to Find
Choose fabric storage ideas that fit your space and cuts. Keep yardage, scraps and project fabric easy to browse, with useful notes after every cut.
By Steve Watts · Co-Founder, Totely
October 15, 2026 · Updated October 15, 2026 · 13 min read
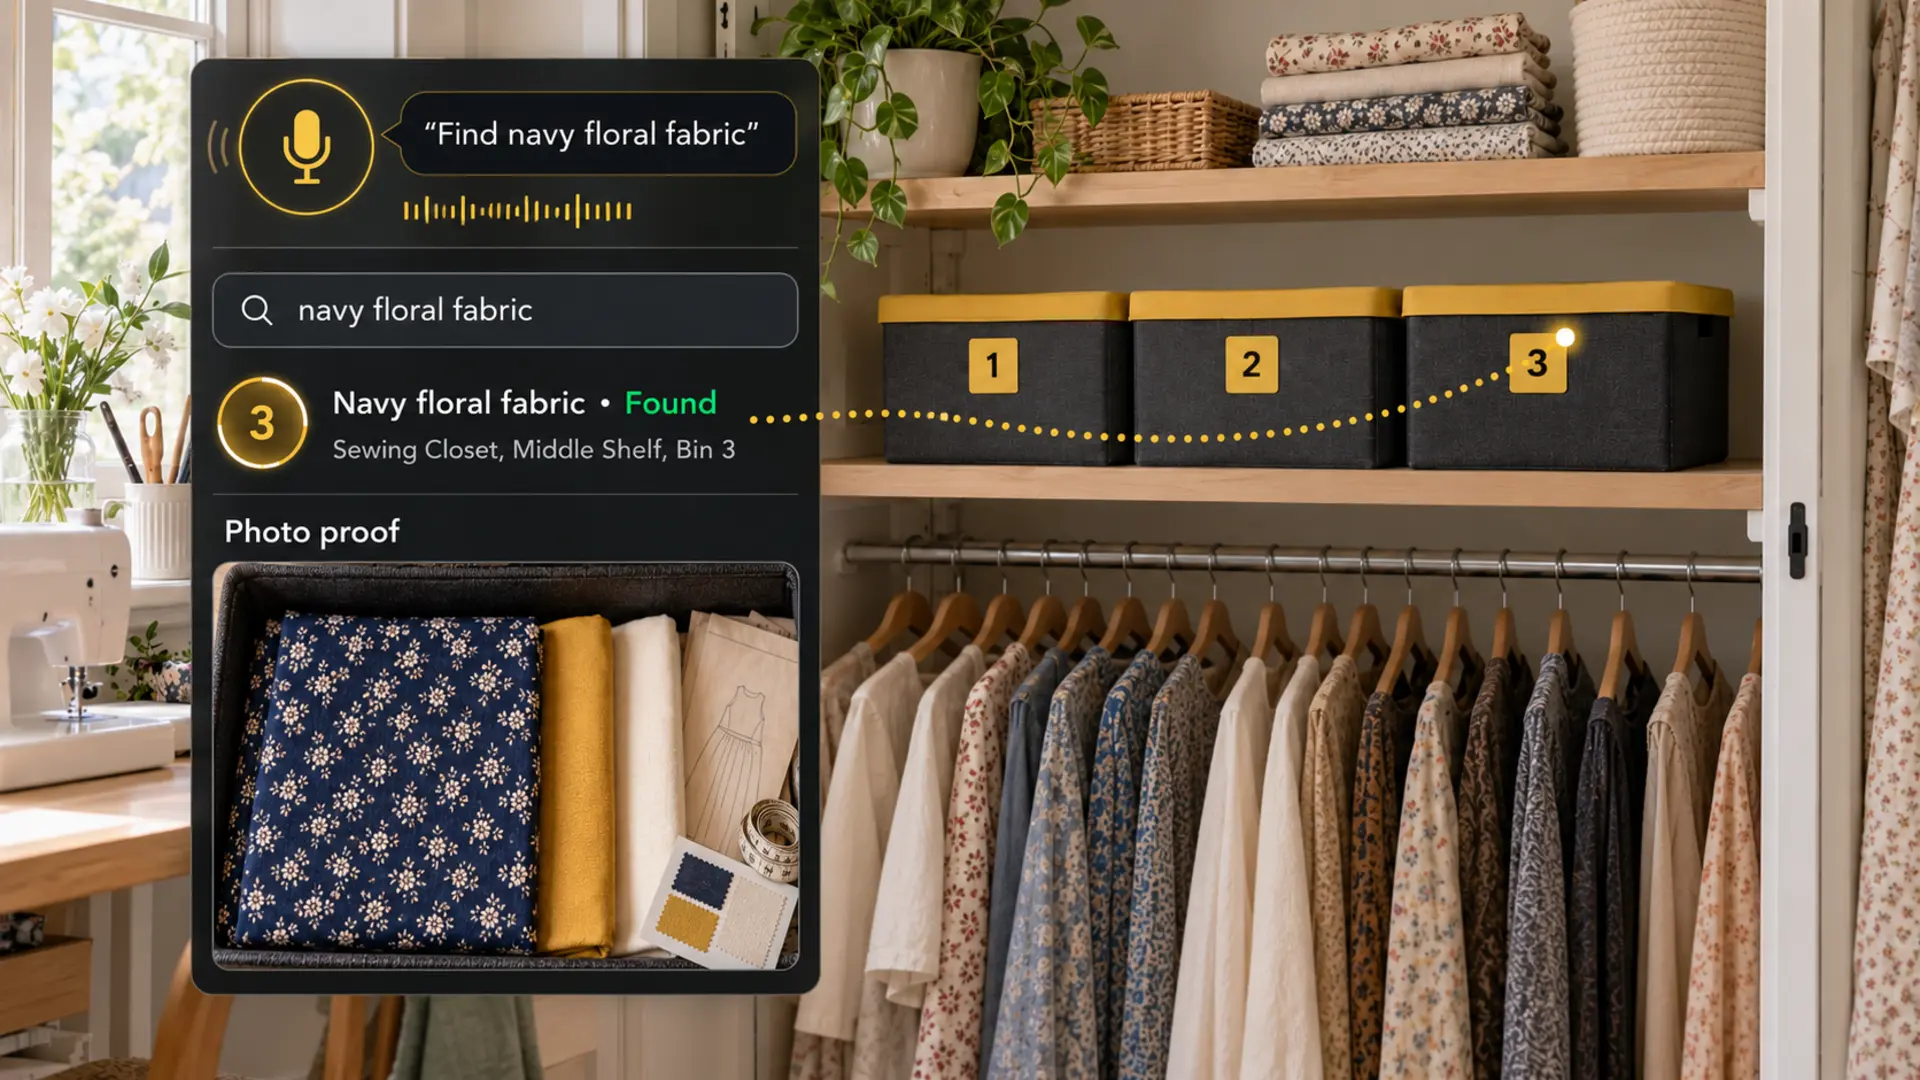
You remember the navy fabric with the little ivory flowers. It would be right for the next project, if you can find it—and if the piece left after the last project is still large enough. Three bins sit on the sewing closet shelf. The fabric is somewhere inside, but the original purchase length no longer tells you what you can use.
Good fabric storage ideas solve both problems. They give different cuts a suitable physical home, then preserve enough information to find and assess the actual piece later. A tidy color stack is useful. A color stack with an accurate location and a current note about the remaining cut is more useful.
Start with one shelf or bin. You do not need to refold your entire collection or measure every scrap before making progress.
Quick Links
Choose Fabric Storage Ideas by the Cut
Before buying containers, separate long cuts, small precuts, irregular leftovers and materials already set aside for a project. Those groups are awkward to browse when everything shares one deep pile.
Then choose the first detail you actually search by. A quilter may look for a color family or collection. A garment sewist may first need a particular fabric type, weight or usable width. You can keep color groups within those categories without forcing every material into one rainbow display.
| Storage choice | Useful for | Check with the actual fabric |
|---|---|---|
| Shallow drawer or removable tray | Small folded cuts and precuts | You can browse and remove one piece without disturbing the whole group |
| Shelf or cubby | Folded working yardage | Fabric is supported, the depth is usable and light or dust exposure is addressed |
| Lidded bin | Less-frequent cuts or a defined fabric group | Folded pieces fit without compression; the filled bin is manageable and accessible |
| Supported project container | Fabric pulled for one current make | Cut pieces and notes fit without being crumpled; the project stays distinct from unassigned fabric |
| Small divided container or pouches within a bin | Scraps grouped by an actual use | Divisions help you find usable shapes rather than conceal another mixed pile |
You may need several formats. A small drawer of favorite scraps and a bin of longer cuts can be a better fit than identical containers for everything.
Keep current projects separate from the general stash
Give an active project a recognizable name and home. Keep its selected fabric, cut pieces and relevant notes together when practical. If a long cut stays on the main shelf, record that it has been set aside rather than making it look freely available for another project.
This can be a plain written note. You do not need a special reservation feature or an elaborate project database.
The craft storage labels guide covers mixed supplies and unfinished projects across the whole craft space. Here, the focus is the fabric itself: how it fits, what remains usable and where that piece returns.
Fit the Fabric to the Shelf and Container
Measure the usable opening, interior depth and clearance above the proposed bin. Include the handle and the space needed to remove the filled container. For drawers, check whether you can see and reach the back when the drawer is open normally.
Choose a folding size around that space and the fabric's needs. For suitable everyday yardage, consistent loose folds can make the group easier to browse. Small cuts may sit upright in a supported row; another fabric may be better laid flat. Do not force bulky or delicate material into the same tight fold just to make the shelf uniform.
Try removing and returning one piece. If the neighboring cuts fall into its gap, use a smaller group or appropriate divider. If the stack collapses whenever you pull from the middle, change the arrangement instead of planning to refold it every time.
Boards and mini-bolts are common options, but ordinary recycled cardboard or foam board should not automatically be described as archival. Check the contact materials and support for the fabric you are storing, particularly for valuable or fragile textiles.
Keep filled containers within the furniture and container makers' load guidance, and follow assembly, installation and anchoring instructions. Avoid a tall, unstable stack that has to be dismantled to reach a frequently used cut.
For cubby measurements and bin clearance, see cube storage bins. If you use an under-bed overflow case, the under-bed storage guide explains why the full pull-out path matters as much as the gap beneath the bed.
Protect Fabric Without Guessing at Care
Choose a clean, dry interior location away from leaks and direct sunlight. A clear bin can help you recognize colors, but it is not a light barrier just because it has a lid. An opaque bin still needs a suitable environment; enclosure does not make damp storage appropriate.
The Canadian Conservation Institute's textile-care guidance identifies light, dust, heat and high humidity among the risks to textiles. It also discusses support and avoiding tight folds. This is conservation guidance for collections, not a requirement to turn an ordinary sewing stash into a museum store.
Fragile, historic or heavily embellished material deserves a separate decision. The Institute's flat-storage note explains the value of full support and minimizing folds for vulnerable textiles. Do not squeeze an heirloom panel into a small everyday bin or try a general cleaning recipe on it. Seek material-appropriate conservation advice when needed.
Keep sharp tools, pins and loose fasteners from snagging stored fabric. Store an identity note beside the cut or with its housing rather than using an adhesive directly on the cloth. The sentimental-item guide can help you record the story behind material you are keeping for family reasons.
Keep preparation and care information with the fabric
Do not assume every fabric should be washed, pressed or stored the same way. Follow the maker's directions for the actual material. If you cannot confirm the composition or care history, record that uncertainty rather than guessing from appearance.
Spoonflower's product-care guidance gives different directions by product and notes that dimensions can change during printing and washing. For a fabric you prepare before sewing, recheck the usable dimensions after that preparation instead of relying only on the original order quantity.
A short note such as “prewashed following supplier directions” or “washing history unknown” is enough. It is a record of what you know, not a promise about future shrinkage or colorfastness. Only put dry fabric back into closed storage.
Record the Usable Piece, Not Just the Purchase
“Bought three yards” describes a purchase. It does not describe the piece after a sleeve, quilt backing or bag panel has been cut from it.
For a cut you expect to search for again, record the details that change the next decision:
- A recognizable name, such as “navy fabric with small ivory flowers.”
- The maker, fabric name or composition from reliable packaging, if known.
- The current measured length and usable width, with units and the date checked.
- Whether it is one continuous rectangle, several separate pieces or an irregular remnant.
- Preparation history and any known limitation.
- Its exact stored location and whether it is set aside for a project.
You do not need every field for every scrap. Prioritize long cuts, similar-looking fabrics, expensive materials and pieces already selected for a make.
Length alone may hide the important limitation
An irregular remnant can have a long edge and still lack the width or shape a pattern piece needs. Describe the largest usable area you actually checked, or write “irregular; remeasure before planning.” Keep separate pieces separate in the note instead of adding their lengths as though they form one continuous cut.
Check your actual pattern layout and material requirements before deciding that a piece is sufficient. A storage record helps you find a candidate. It does not establish that a garment, quilt or project can be cut successfully from it.
Build a Fabric-to-Bin Map
Give each main bin a simple visible number. Keep that number with the physical container, then save the room, cabinet and shelf separately. The outside can stay simple while the record describes individual fabrics.
Here is a hypothetical example, not a measured collection or a recommendation that these fabrics share identical care needs.
| Fabric or group | Current amount or shape note | Saved home |
|---|---|---|
| Larger everyday cuts | Individually checked as needed; do not use original order totals as current amounts | Sewing Closet, Lower Shelf, Bin 1 |
| Small precuts and scraps | Separate groups by a useful size or use; irregular pieces need checking | Sewing Closet, Lower Shelf, Bin 2 |
| Navy floral cut | Example only: one rectangle measured at 2 yd long × 42 in usable width on October 15, 2026; preparation history recorded separately | Sewing Closet, Middle Shelf, Bin 3 |
| Mustard and cream coordinates | Separate cuts; add their own details rather than combining amounts | Sewing Closet, Middle Shelf, Bin 3 |
| Fabric selected for a current project | Project name and current location; mark as set aside in the stash note | Project container at the sewing table |
The navy floral cut has an address: Sewing Closet, Middle Shelf, Bin 3. The search description can include “small ivory flowers,” the actual maker's name if known, and any project association you would recognize later.
Photograph the visible contents while the bin is already open. Add a note for anything under another fold or inside a project pouch. You do not need to unfold every cut to improve the overview photo.
A physical swatch can help when you need to judge texture or compare colors in person. Keep it associated with the same description and source information. A screen photo is a reference, not proof of exact color, fiber content or usable dimensions.
Update the Record After Cutting
Choose one practical update moment: when the remaining fabric goes back into storage. At that point, check what is actually returning and where it will live.
| What happened | Useful update |
|---|---|
| A piece was cut from the yardage | Replace the old quantity or shape note with what remains; remeasure if the next use depends on it |
| One cut became several leftovers | Record the separate pieces or move them to the scrap group; do not keep describing a continuous length |
| Fabric was pulled for a project | Add the project name and current home; make its set-aside status clear |
| Fabric returned unused | Confirm its location and remove the set-aside note only when it is available again |
| The whole bin moved | Keep its visible number and replace the saved shelf address |
In the hypothetical navy floral example, suppose the returned fabric is now a rectangle measuring 34 in × 40 in, plus a separate 12 in × 8 in offcut. Those are two pieces, not the original two-yard cut. Record them that way, or leave the dimensions unconfirmed until you check.
You do not need to reconstruct every cutting session from memory. “Part used; remaining amount not yet checked” is an honest and useful update. A precise old number is not more helpful than a current uncertainty note.
For the broader location habit, see how to keep track of storage bins.
The One-Bin Starter Method
Pick the fabric group you most often search for.
- Open one manageable bin on a clean, dry work surface.
- Separate longer cuts, small pieces and materials already assigned to a project.
- Check that the storage supports the contents and lets you browse without forcing anything.
- Choose a clear number for the outside of the bin.
- Take a reference photo while useful contents are visible.
- Add a few recognizable fabric names, relevant care or preparation notes, and the exact shelf location.
- Measure only the cuts whose next use depends on a reliable amount; record units and uncertainty.
- Test finding one piece from the record, then agree to update it when material is returned.
If you can find the navy floral fabric and see that its remaining amount needs checking, the record has already answered something a color label could not.
How Totely Helps
Totely adds a digital memory layer after you have chosen practical storage for the actual cuts.
Number Bin 3, take a contents photo, and let AI suggest an initial item list from what is visible. Review the list and correct the descriptions so they use your names for the fabrics. Add important details yourself: the original source, a human-measured amount, preparation history, an irregular shape or a project note.
Save Sewing Closet, Middle Shelf, Bin 3 as the location. Later, a natural search for “navy floral fabric” can point to that saved container. Photo proof can help you recognize the floral cut and its mustard and cream companions before opening the other bins.
AI cannot measure folded yardage from that photo, confirm fiber content, establish washing history or know that you cut a piece yesterday. Totely is not being presented here as an automatic fabric-accounting or pattern-layout tool. Update your notes when the amount, project assignment or location changes.
You do not need QR codes, barcodes or manual entry of every scrap to start. One accurate bin-level record and a few useful cut notes can be enough. For a wider creative workspace, see the craft supply inventory use case.
Fabric Storage FAQs
Is it better to store fabric in bins or on shelves?
Choose by the actual cuts, exposure and access. Shelves can make working fabric easy to browse; lidded bins can enclose defined groups. Either needs suitable support, a dry location and enough room to remove and return fabric without squeezing it.
Should fabric be folded or rolled for storage?
Use a method appropriate to the material and space. Loose folding can suit everyday working cuts. Delicate or historic textiles may need different support and housing. Do not assume a tight mini-bolt or improvised roll is appropriate for every fabric.
Should I wash fabric before storing it?
Follow the maker's directions and your project's preparation needs, rather than washing everything automatically. Record whether it was prepared, is still unwashed or has an unknown history. If preparation changes the dimensions, update the usable amount afterward.
How should I organize fabric scraps?
Separate them from longer cuts and group them by a useful size, shape, color or intended use. Keep irregular remnants distinct from continuous yardage. Choose a container you can browse and return pieces to without rebuilding a mixed pile.
What should I record when I use part of a fabric cut?
Update the current amount or describe the remaining shape, with units when measured. Note separate offcuts, project assignment and the new location if anything moved. If you have not checked the remainder, say so instead of retaining a misleading old quantity.
Can AI tell how much fabric is left from a storage photo?
Not reliably from a photo of folded contents. A photo can help identify visible material, but a person still needs to measure the usable piece and check its suitability for the pattern. Add those details to the saved record yourself.
Make the Next Cut Easier to Find
The useful fabric-storage system is the one you can browse, use and put back accurately. Start with support and fit, keep material-specific care information, and describe the piece that actually returns—not just the amount you once bought.
Try one fabric bin through the One-Tote Test. Stored, not lost.