Bicycle Storage Garage Ideas: Keep Bikes and Gear Easy to Find
Plan garage bicycle storage around bike access, choose suitable supports, and keep pumps, helmets and stored spares findable with a numbered gear map.
By Steve Watts · Co-Founder, Totely
October 13, 2026 · Updated October 13, 2026 · 14 min read
The bike is visible. The red floor pump is not. You can reach the handlebars, but getting the bicycle out means moving another bike, and finding the pump means opening three black bins. A neat row of racks has solved only part of the garage problem.
Useful garage bicycle storage gives the bike a position you can actually use and gives its supporting gear an address you can remember. Before buying a wall rack or filling another tote, test the whole routine: remove the bike, retrieve the gear, and put both back.
You do not need to catalog every cycling accessory. Start with the bicycle you use most and the item people keep asking for.
Quick Links
Plan Bicycle Storage Around the Removal Path
A parked bike occupies one shape. The space needed to roll, turn, tilt or lift it out can be larger. Measure both before committing to a layout.
Start with the garage in its ordinary configuration. If a car normally parks there, assess the bike area with the car parked and its doors accounted for. Include the second bicycle, workbench, bins and any other objects that usually remain in place.
Look at the actual bike's length, handlebar width, pedals and accessories that project beyond its frame. A basket, child seat or rear rack can change the space you need. Then consider the person who retrieves it: can they perform the required movement comfortably while keeping control of the bicycle?
Walk through the sequence with the bike supported appropriately:
- Reach the bicycle without shifting an unstable pile.
- Release it from its intended support using the maker's instructions.
- Move it into the clear route toward the exit.
- Retrieve the helmet, pump or other gear needed for the ride.
- Return the gear and bicycle to their intended homes.
This is a layout rehearsal, not a load test for an improvised mounting system. Do not hang a bike from unverified hardware to see whether it holds.
If the arrangement requires moving the car every time, decide whether that is a routine your household will maintain. An occasional bike may suit a less convenient position; the bike used most often deserves access you have deliberately checked.
For the surrounding shelves, tools and seasonal equipment, use the broader garage storage zones guide. Keep the bike's route clear within that larger plan.
Choose Floor, Wall or Overhead Storage
The most compact storage format is not automatically the most usable one. Compare the way each option loads and unloads with your actual bicycle, garage and rider.
| Storage format | When it may suit the routine | What to check |
|---|---|---|
| Suitable floor stand | A bike that needs straightforward roll-in access, or a location where wall installation is unsuitable | Bike and stand compatibility, stable placement, full parked footprint and a clear removal route |
| Vertical wall rack | Available wall area and a rider who can manage the specified loading motion | Wheel and tire fit, fenders, bike weight, mounting requirements and clearance when moving the bike away from the wall |
| Horizontal wall rack | Wall space that can accommodate the bike's length and appropriate frame support | Approved contact points, frame shape, handlebar projection, lifting motion and access to neighboring bikes |
| Rail or adjustable multi-bike system | Several bikes with different sizes or changing positions | Each bike's compatibility, spacing while loaded, access to one bike without uncontrolled movement of others and actual installation instructions |
| Overhead hoist or ceiling system | A suitable ceiling and a retrieval routine that can accommodate lowering and raising | Structural support, rated load, garage-door and vehicle clearance, locking mechanism and the complete lowering area |
A floor stand uses floor space, but it may be the practical choice when lifting or wall installation would complicate everyday use. A wall rack can reduce the floor occupied by a bike, but handlebars and the removal motion still need room. An overhead system also needs a usable area below it when you retrieve the bicycle.
Do not choose solely by a photo of an empty rack. Find the manufacturer's installation and compatibility information, then compare it with the bike and the space you have.
Avoid a large rack purchase until you have checked one representative bike position. Several tightly packed bikes can look orderly while leaving the one you want trapped behind the others.
Check the Bike, Rack and Garage Together
A rack's stated load limit does not tell you whether your wall or ceiling can support the installation. Nor does it establish that the rack's contact points suit every bicycle.
Use the actual rack and bicycle makers' instructions. Check the bike's weight and dimensions, wheel or tire requirements, frame contact restrictions and any accessories that affect fit. Follow the specified mounting surface, hardware, spacing and assembly directions. If the supporting structure or installation is uncertain, get appropriate installation advice before loading the rack.
As a product-specific example, Steadyrack's installation guidance says its supplied anchors are for masonry and warns against mounting directly into drywall alone. That example illustrates why “a wall hook” is not one universal installation method; it is not a hardware recipe for another brand.
Keep the setup clear of moving garage-door hardware and other doors. Check the arrangement when nearby storage is in use, not only when everything is closed and pushed against the wall. Do not turn a bike's access route into the place where temporary boxes accumulate.
Follow your bicycle and accessories' care instructions when deciding whether the garage environment is appropriate. Packing damp or dirty gear directly into a closed bin may not suit its care requirements; clean and dry it as directed before returning it to storage.
Treat e-bike battery storage separately
An e-bike may change both the rack choice and the storage plan. Use the actual bicycle's weight and the rack's compatibility requirements, and follow the battery maker's storage and charging instructions.
The Bosch eBike Battery Guide, for example, gives separate guidance for battery storage away from heat sources and flammable materials. Its instructions apply to the products it describes. Do not assume that a general cycling-gear bin or an unconditioned garage is an appropriate battery location.
The bin examples below contain ordinary cycling gear, not a battery-storage or charging setup.
Give Riding Gear a Nearby Home
A visible bicycle does not tell you where its helmet, pump, removable lights or lock went. Give the gear you retrieve with that bike a nearby, appropriate home.
Use an open shelf, basket or hook where frequent access makes sense. Use a manageable bin for less-used accessories or for a group that travels together. You can combine open and closed storage without making every item live inside a tote.
A floor pump used regularly might stand in a suitable dedicated spot. A pump stored between occasional rides might fit lengthwise or diagonally in a sufficiently large bin. Measure the pump, including its handle and base, and check that the hose is not crushed. Do not force a tall pump into a container that only fits its cylinder.
Keep small companions in inner cases or pouches where appropriate. Tire levers can stay in a case; a spare tube can retain its identifying packaging. Avoid mixing cycling-specific components into a general garage hardware bin simply because both contain small parts.
Keep identification separate from compatibility
“Spare tube” is a useful category but an incomplete record. Copy the identifying details from its packaging and record whether you have actually checked which bicycle it suits.
Schwalbe's tube finder uses tire size and valve type as selection inputs. A contents photo or a nearby bicycle cannot establish those details on its own. Use the actual tire, component and bicycle information, or have a qualified shop confirm an uncertain part.
A useful note might say: “Tube package photographed; size and valve copied from the print. Commuter-bike match still needs checking.” That gives the next person a useful starting point without presenting an unchecked part as ready to use.
Separate items awaiting inspection or identification from gear you expect to retrieve for a ride. A storage inventory locates an item; it does not inspect a helmet, certify a repair or make an unknown part compatible.
For cycling tools that share a workshop, the garage tool inventory guide covers the wider tool and hardware system.
Build a Bike and Gear Location Map
Give the bike position a familiar name and give each stored gear bin a stable, visible number. The bike can remain on its stand while the searchable record points to the supporting items.
Here is a hypothetical two-bike garage setup. It is an example to adapt, not a tested layout, rack recommendation or verified parts list.
| Home | Exact location | What belongs there | Record note |
|---|---|---|---|
| Commuter bicycle | Garage Bike Bay, Left Floor Stand | The bike used most often | Removal route checked with the household's usual parked-car arrangement |
| Second bicycle | Garage Bike Bay, Right Floor Stand | The other bike | Recheck spacing when either bike changes |
| Bin 1 | Garage Bike Bay, Lower Shelf, Bin 1 | Less-used cycling layers and dry gloves | Follow actual garment-care instructions |
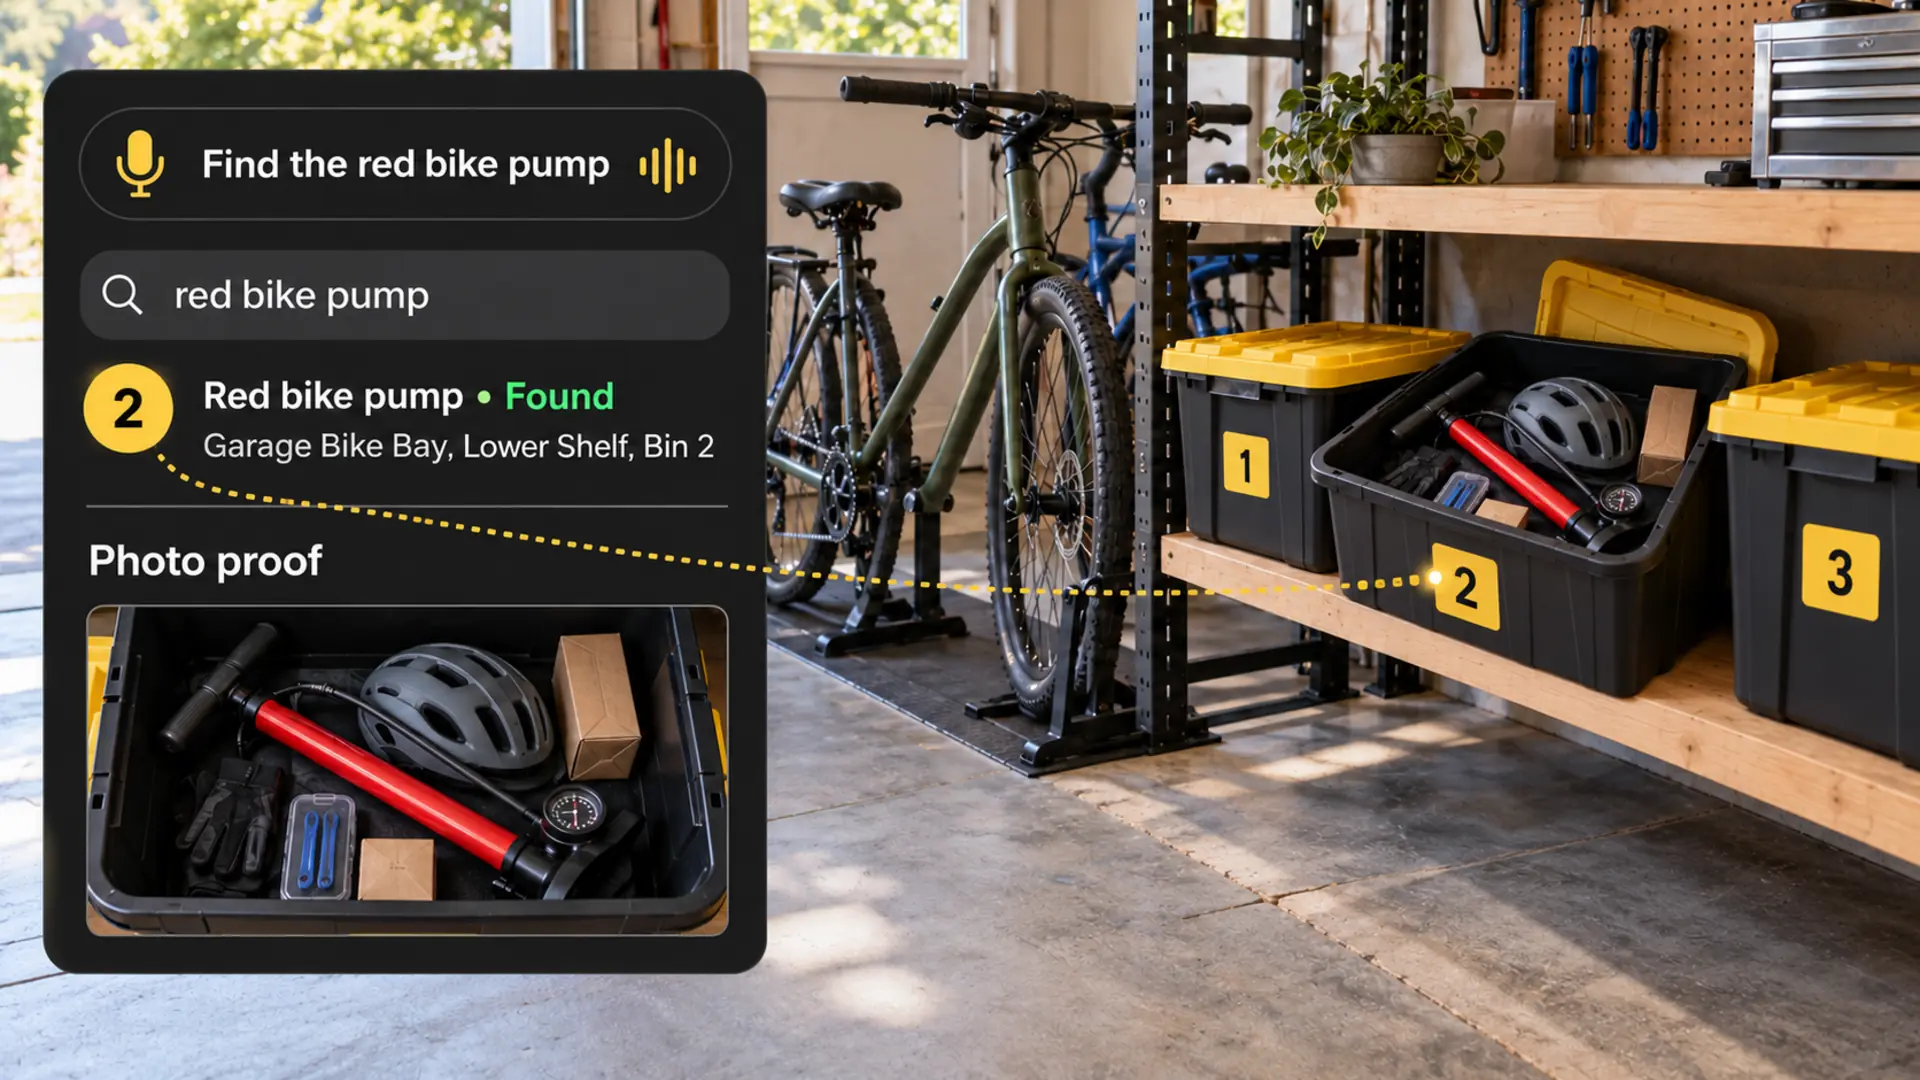
| Bin 2 | Garage Bike Bay, Lower Shelf, Bin 2 | Red floor bike pump, helmet, gloves, tire-lever case and packaged spare tube | Tube identification recorded; compatibility still unconfirmed |
| Bin 3 | Garage Bike Bay, Lower Shelf, Bin 3 | Identified replacement accessories and small-part kits | Retain original packaging and record which details were checked |
The outside of Bin 2 needs a clear 2. The detailed record can say Garage Bike Bay, Lower Shelf, Bin 2, with the familiar names people will search for.
Take a reference photo while the contents are visible. Add a human note for an item inside a closed pouch or underneath another object. You do not need to unpack every small kit for the photograph if its existing packaging and a descriptive note give you a useful record.
Test the bike and gear together. Can another person remove the intended bicycle and find the red pump using your map, while the other bike and car remain in their ordinary places? If the record leads to Bin 2 but the bin cannot be pulled out, the physical layout still needs attention.
Use the same approach for another activity only when it helps. The camping gear storage guide applies a similar contents-and-location habit to stored outdoor equipment.
Update the Record After a Ride or Move
Choose an update moment that fits the way you use the garage: returning gear after a ride, putting away an occasional-use kit or moving the bike bay.
Suppose the red pump leaves Bin 2 and stays in the car's cargo pocket for a trip. The bin number and shelf location are unchanged, but a record that still says the pump is inside Bin 2 needs correcting.
| What changed | Physical action | Information to update |
|---|---|---|
| Pump stays in the car after a trip | Put it in the intended car-storage spot | Record its current known location instead of leaving it listed as present in Bin 2 |
| Pump returns to Bin 2 | Confirm it is physically back | Remove the temporary-location note |
| Bin 2 changes shelves | Move the same numbered bin to a suitable position | Keep number 2 and replace the exact shelf address |
| A bike is replaced or gains an accessory | Recheck its actual support, footprint and removal motion | Revise the bike-position note and any verified gear association |
| A stored part is identified or checked | Keep it with its appropriate packaging | Update only the detail that was confirmed; do not imply a mechanical inspection occurred |
| Gear leaves the household | Remove the actual item | Remove or revise its contents entry |
You do not need to log a pump leaving the bin briefly if it is returned immediately. Record changes that would otherwise send someone to the wrong location later.
A photograph is a reference to what was recorded at that moment. It is not a live view of the bin. For the household-wide version of this habit, see how to keep track of storage bins.
Try one bike and one bin first
Check one bike position, choose one manageable gear container, give it a number and save a photo with an exact location. Ask someone to retrieve one item and return it.
That small exercise reveals whether the support, removal path, bin access and description work together. Expand after that first setup is usable.
How Totely Helps
Totely adds searchable memory after the bike and its gear have appropriate physical homes.
Number Bin 2, take a clear reference photo and let Totely suggest an initial item list from what is visible. Review that list, correct names and add a note for the packaged tube or anything hidden in a case.
Save Garage Bike Bay, Lower Shelf, Bin 2 as the location. Include recognizable descriptions such as “red floor bike pump,” “helmet,” “cycling gloves” and “tire-lever case.” Keep any uncertainty about the spare tube in the human-written note.
Later, a natural search for the red bike pump can point you toward the saved container. The contents photo helps confirm the right bin, and the physical number connects that record to the shelf.
If the pump stays in the car, update the record yourself. Totely cannot know an item moved unless the saved information changes. A photo cannot reveal every hidden component, and the app does not establish rack safety, mechanical condition or part compatibility.
Start with one bin-level photo and a few useful names. You do not need QR codes, barcodes or a separate entry for every tire lever to make stored cycling gear easier to find.
Garage Bicycle Storage FAQs
Is floor or wall storage better for bikes in a garage?
Choose around the actual bike, rider and space. A suitable floor stand can provide straightforward roll-in access but occupies floor area. A wall rack can reduce floor use while requiring the correct support, fit and loading motion. Test the removal route before choosing.
How much space should I leave between stored bikes?
There is no universal spacing for this method. Account for the bikes' handlebars, pedals, accessories, rack instructions and loading motion. Check that one bicycle can be removed while the others remain controlled and supported.
Can I hang any bicycle from a wheel hook?
Do not assume every hook suits every bicycle. Check the rack and bicycle makers' compatibility and support guidance, including weight, wheels, tires, fenders and contact points. Use the specified installation method.
What cycling gear should stay near the bike?
Keep the items you actually retrieve with it nearby where their care and access requirements allow: helmet, pump, gloves, lights, lock or a repair kit. Less-used spares can have separate numbered storage. Keep battery handling governed by the actual manufacturer's instructions.
How do I find the pump without opening every gear bin?
Give its stored bin one clear number, save an exact shelf location, take a contents photo and include “red bike pump” or another familiar description. Update that record if the pump stays somewhere else.
Does a gear inventory tell me whether a spare part fits my bike?
No. It can record identifying details and the result of a compatibility check you performed. Confirm fit using the actual bike, tire or component information and appropriate manufacturer or shop guidance.
Give the Bike and Its Gear a Usable Home
Useful bicycle storage in a garage works with the rest of the space in its normal state. Choose suitable support, allow the full removal motion and give the gear a nearby address.
Start with the bike people ride and the pump they ask for. Keep the physical route usable and the saved record current. Stored, not lost.